Water heaters are essential in our daily lives, providing hot water for showers, laundry, and dishwashing. When they fail to produce hot water, it can be quite disruptive. One common cause of this problem is a malfunctioning water heater element.
This comprehensive guide will explain how to identify and fix issues with your water heater, with a particular focus on testing the water heater element.
Step 1: Getting Ready for the Job
The initial stage of any troubleshooting endeavor requires thorough preparation. To examine your water heater element, it’s crucial to comprehend its configuration and confirm the availability of essential tools.
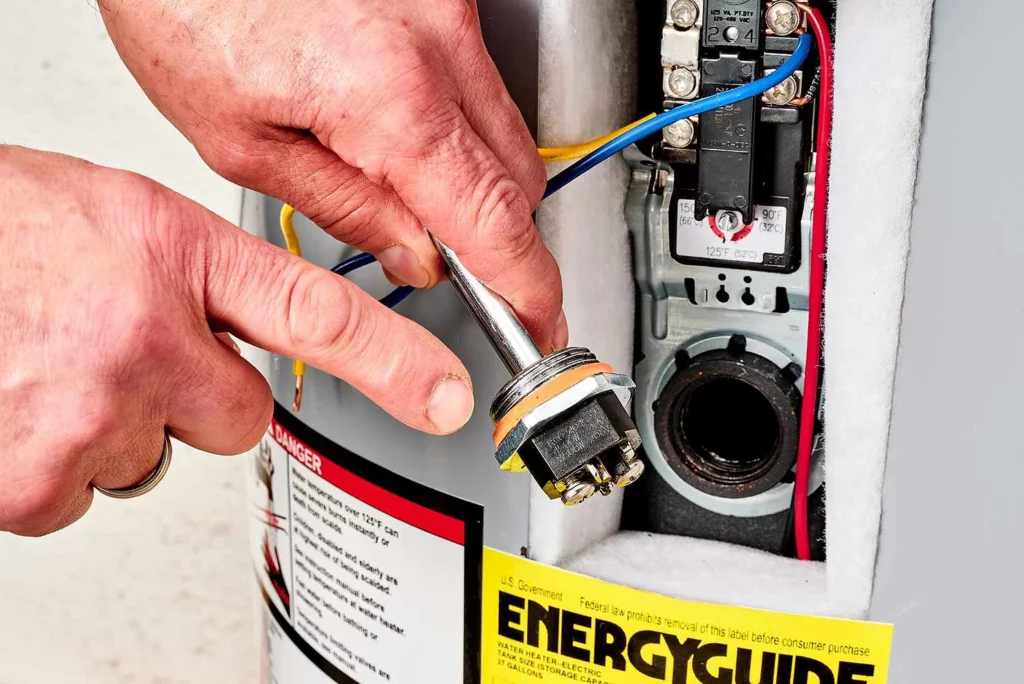
Each water heater incorporates an element, a compact enclosure connected to electrical wiring. Typically affixed to the heater’s tank using bolts, locating it may necessitate consulting your heater’s technical specifications.
Collecting Essential Equipment
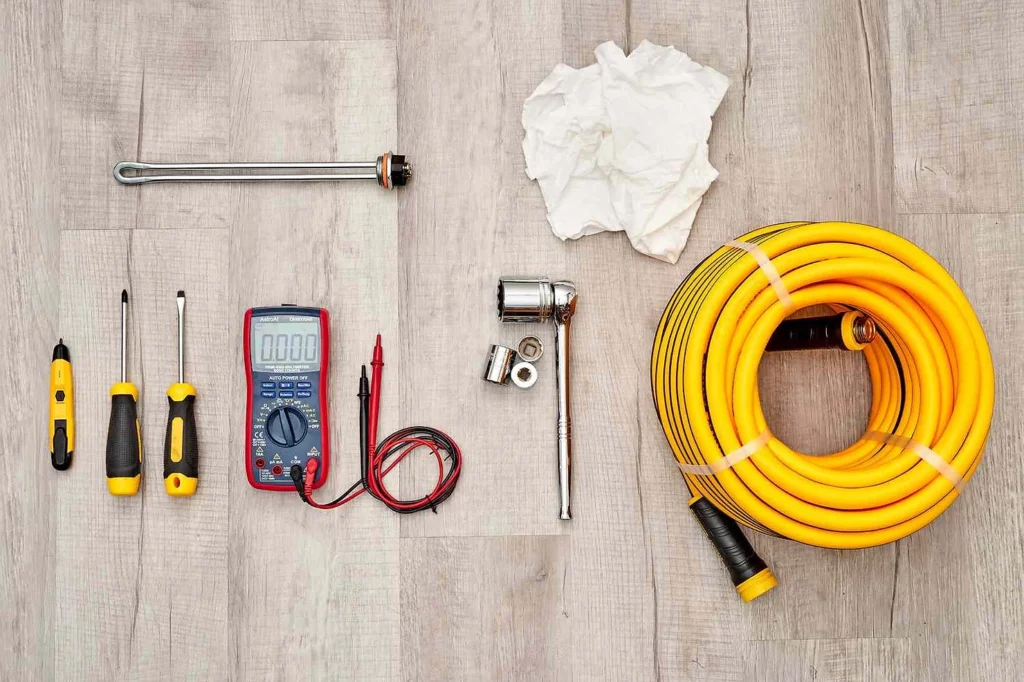
Prior to commencing the task, it is imperative to assemble all required tools:
- Screwdriver: Necessary for removing the metal covers on your water heater, facilitating access to the elements.
- Multimeter: A crucial device for testing both the water heater elements and the thermostat. Ensure it features an ohm setting (denoted by the Ω symbol) for resistance measurement.
- Insulated Gloves: These safeguard your hands when handling electrical appliances.
- Eye Protection: Essential for shielding your eyes from small debris or dust that may be generated during the process.
- Torch or Flashlight: Depending on the lighting conditions in your work area, you may require an additional source of illumination.

Step 2: Turn Off Your Water Heater’s Power
Prioritizing safety for yourself and others is paramount when handling electrical devices. Before commencing any tasks, always switch off your water heater at the circuit breaker. It’s important to keep the breaker off until you’ve completed testing and replaced all covers.
Step 3: Reach the Elements
After switching off the power, proceed to access the water heater elements. Generally, there are two metal covers located on the side of your electric water heater. Utilize a screwdriver to detach these covers, unveiling insulation that must be extracted.
Beneath the insulation, there are plastic covers that must also be removed to reveal the thermostat and heating element.
Step 4: Testing the Heater Elements
Once the water heater elements are accessible, you can initiate the testing procedure.
Disconnect the Element Wires
Carefully detach the two wires connecting each heating element to the heater’s circuitry, ensuring they do not come into contact with each other or any metal components.
Adjust Your Multimeter
Set your multimeter to the ohm setting, allowing you to gauge the element’s resistance. Typically, a properly functioning element will exhibit a resistance ranging between 10 and 30 ohms.
Measure the Resistance
Position the multimeter probes on the heating element screws where the wires were disconnected. If the reading falls outside the 10-30 ohms range or indicates an infinity symbol, signifying no continuity, it’s probable that the element is defective.
Ensure to test both elements: the upper heating element and the lower heating element. If only one of the two is operational, this suggests that your hot water temperature may be lower than usual.
Step 5: Exploring Alternative Concerns
If you’ve followed these steps and determined that your water heater element is functioning properly, there may be other underlying issues to consider, such as a malfunctioning thermostat or an ineffective upper thermostat.
Thermostat
Testing the Thermostat
The thermostat of the water heater, responsible for regulating the heating elements, could be a source of trouble if it’s defective. Similar to testing the element, disconnect the wires from the thermostat with the power off and utilize your multimeter to assess for resistance.
Inspecting the Upper Thermostat
In many water heaters, the upper thermostat governs the lower thermostat and heating element. Any malfunction in this component could disrupt the power supply to these elements, resulting in operational issues with your water heater.
Additional Considerations
Besides a malfunctioning heating element or thermostat, there are several other factors that could disrupt the performance of your water heater:
Accumulation of Sediment:
Over time, minerals from the water can settle at the tank’s bottom, forming sediment layers. This insulation can force the heater’s burner to work harder and less efficiently.
Elevated Water Pressure:
Excessively high water pressure in your home can cause damage to your water heater and associated plumbing fixtures.
Corrosion:
Corrosion may develop inside the tank due to interactions among the steel tank, water, and the anode rod designed to attract corrosive elements. If left unaddressed, this corrosion can result in leaks.
Faulty Temperature and Pressure Relief Valve (T&P Valve):
This valve is engineered to release water if tank pressure or temperature becomes excessive. If it malfunctions, it could lead to tank ruptures.
Leaks in Water Supply Lines:
Leakage may occur in pipes supplying water to and from the heater, resulting in reduced hot water availability and potential water damage in your residence.
Gas Supply Challenges:
Gas water heaters may experience issues stemming from a defective gas control valve, obstructed vent, or pilot light problems.
Tank Size:
If your household’s hot water consumption has increased, your current water heater might not suffice, necessitating an upgrade to a larger capacity unit.
FAQs
What safety precautions should I take before testing the water heater element?
Always turn off the power to the water heater at the circuit breaker before starting any testing. Wear insulated gloves and eye protection to ensure safety.
How do I access the water heater elements?
Turn off the power, remove the metal covers on the side of the water heater with a screwdriver, and then remove the insulation and plastic covers to reveal the thermostat and heating elements.
How do I test the thermostat of a water heater?
Disconnect the wires from the thermostat and use a multimeter to check for resistance. If the thermostat is defective, it could be causing issues with the heating elements.
What maintenance tips can help ensure the longevity of my water heater?
Regularly checking for sediment buildup, inspecting for corrosion, ensuring proper water pressure, and verifying the functionality of the T&P valve can help maintain your water heater.
What should I do if I’m unsure about testing or repairing my water heater?
If any step is unclear or if you’re uncomfortable performing the tests, it’s best to consult a professional for assistance. Consistent maintenance and a good understanding of your water heater’s operation are key to ensuring reliable hot water supply.
Conclusion
Acquiring the skill to troubleshoot your water heater through element testing can be a valuable time and energy saver. This proficiency empowers you to grasp the issue before seeking professional assistance, potentially hastening the restoration of your hot water supply.
Safety should always be paramount when handling electrical appliances – remember to deactivate the power before initiating any water heater repair procedures. If any step seems unclear, conducting additional research or seeking professional advice is recommended. Consistent maintenance and a comprehension of your water heater’s operation are essential for ensuring a dependable provision of hot water for your daily requirements.


